Wednesday, March 31, 2010

Embraceable

My niece Paige and her boyfriend Kelly caught in a sweet embrace.

This is the last one! I have finally finished up the gorgeous K@Company Susan Winget "Nature" collection. I hope you have enjoyed it as much as I have and are just as ready to move on! LOL!

I could just as easily have named this "the Bettylou page" since nearly everything on here came from her, including this gorgeous bead and lace dragonfly that she made herself. She also shared the treasure chest of lace and ribbon she was able to accumulate at a craft store "going out of business" sale.


I used 2 different Martha Stewart border punches and strung ribbon through the lace, adding jewels with mini glue dots... love those things! The title is a Silhouette cut.


The gorgeous organza flowers are also some of Betty's beautiful handiwork.


Thanks so much for taking this K@Company "Nature" tour with me.

Tuesday, March 30, 2010

Bloom

This photo of Ceairrah was taken at Gary's birthday back in January. I was actually trying to get his photo at the time. We were back in the kitchen where his mom was dishing up cake and he was licking the frosting off the transformer that decorated it, but CC was helping her mom take plates out to the guests, saw my camera, stopped directly in front of me and gave me this little smirk. That is frosting on her chin.

Do you think I am ever going to get through this K&Company Susan Winget "Nature" collection? Lovely as they are, even I am beginning to tire of them. I suppose it is pure laziness that motivates me to scrap one collection at a time, that and an abundance of photos to select from so that I nearly always have one to match my papers, and a shortage of scrap space and storage so that once I have everything out I want to finish it up so I don't have to
find a place to put it, or go hunting for it later. And since I give much of my work away, it also spreads the collection out. If I remember correctly, this is the only page I have done from this collection that I am keeping for myself!


If you are new to my blog and wondering how to create this border effect, please refer to my post titled "Sweet," where I provided a tutorial. I cut the floral flourish on my Silhouette and then inked the flowers and added stickles to the stem. The flowers and leaves are Prima.

I used a Martha Stewart punch to create the white border, adding the Prima pearl stem, flowers, leaves and pebbles. I then layered a piece of lace I tied in the center under the ribbon bow.

The dragonfly is another Silhouette cut that I inked to mimic the watercolor effect that is a quality of this paper collection that I so love. I attached the ribbon by twisting and sticking it to the paper with mini glue dots. The buttons are an assortment that I have collected over time.


Thank you so much for taking the time to visit.

Monday, March 29, 2010

I'm no scrap booking super woman

I don't know how many times I have been asked how I find the time to produce so many layouts. I have blamed it on frequent bouts of insomnia, (true enough), and laughed it off with humor, but the truth is much more complicated and goes to the heart of who I am and what my life has been.

Many of us joke about being obsessed with scrap booking, calling it our addiction. For me, it is not a joke, though it is easiest to try and make it one. The truth is that I scrap book to the exclusion of almost everything else.There are days when it is the only thing that gets me out of bed in the morning.

I have battled depression all of my life, sometimes debilitating depression. I received a double whammy with a history of clinical depression on both sides of my family as well as a family history of sexual abuse on my paternal side. I am myself an incest survivor. That is not something easily worked into a casual online conversation, but is also something that I no longer keep secret. It is just a fact, and one that informs who I am, which includes an obsessive quality to my personality. While I understand intellectually that moderation in all things is the healthy approach, it is not something that comes naturally to me. Moderation requires a tremendous effort of will on my part, something I'm a little short on right now with the additional weight of menopause enhancing and complicating my depression.

My obsessions have varied through the years, but pictures have always been extremely important to me, and I have always maintained albums that serve, in an even more significant way than to the average person, as my memory. As is so commonly the case with childhood abuse, I suppressed and erased the trauma as a means of coping with it, and most of my childhood, except that which I can view through pictures, is a complete blank. The habit of disassociation that served me so well as a child, helping me survive the horror of what was being done to me when I had no means of physical escape, has not served me so well as an adult since whenever I am in a stressful situation my natural instinct is to just go away somewhere inside my head. Staying present in the moment is a constant challenge, one that I am not always up to. Because I have such a rich inner life, my memory continues to suffer, and photographs continue to fill that void.

Scrap booking not only involves the photographs that are important to me, but gives me the opportunity to bring order and beauty to my life in a very therapeutic, hands on way. In a world where there is so much ugliness, and so much that is beyond our control, art allows us to focus on that which is beautiful, not only in the world, but inside of us. It provides an outlet to express both, something that I am very much in need of currently.

I cannot begin to express how important the validation I receive from this online community is to me, or how very grateful I am for the comments. My sincere thanks.


Sunday, March 28, 2010

Journey


Here she is again, my darling little tomboy niece. The photo was taken last summer when my sister and her kids came back to Utah for a visit. This was taken outside of Cedar City in Southern Utah. Don't I live in a gorgeous state? This combination of red rock, green foliage and blue sky is a particular favorite of mine. I also think it is really cool the way the sunlight makes a "V" shining down into the canyon ending in a point right where Keilani is sitting.


That background sheet of patterned paper from the K@Company Susan Winget "Nature" collection is the twin sheet that I have been using to cut all the butterflies from. This paper pad comes with 2 sheets of every design, and as you can see,this one is just covered in those gorgeous butterflies!

My husband, the practical functionalist, taught me how to line up my punch from the back side, which I use when rounding corners. From the back you can see where the punch lines up on your completed punch holes and it makes the corners look better. This particular punch is a Martha Stewart. The white border is a die cut I made with the Silhouette.


These handmade flowers are more of the torn circle flowers I learned to make from the tutorial on Gabrielle Pollacco's blog.


These layered butterflies are more that I cut from the twin paper, layering right over the top of those on the background pp. I inked the edges first, to give them some added dimension, and added Prima E-line pearls to the large one. I did the same to a butterfly on the bottom edge of the page, as well as a dragonfly on the top of the page. That way they overlap the other papers as well as giving dimension.

Thanks so much for stopping by to take a look!

Saturday, March 27, 2010

a Window into my World ~ Ceairrah and Gary


My grand kids are definitely a window to the world. Their unique view on things makes everything fresh again, which reminds me of a story. (You know you are getting old when you start saying that! LOL) \

Their daddy is rather famous among those of us who know him well for his moods. He can be the most fun and delightful person to be around when he is happy, with a laugh that rattles the rafters and makes you feel good all over for hours after hearing it, one that you can't help but join, and dark moods like thunder storms. He apparently came home thundering one day, stomping around the house, glowering, only to be sweetly approached by his 3-year-old son and asked, "Daddy, did mommy take away your toys?"

Just thinking about it makes me roar with laughter... every single time! It is a story that delights his wife and I, and one that rightfully makes him blush! Awww, the insight of the young!


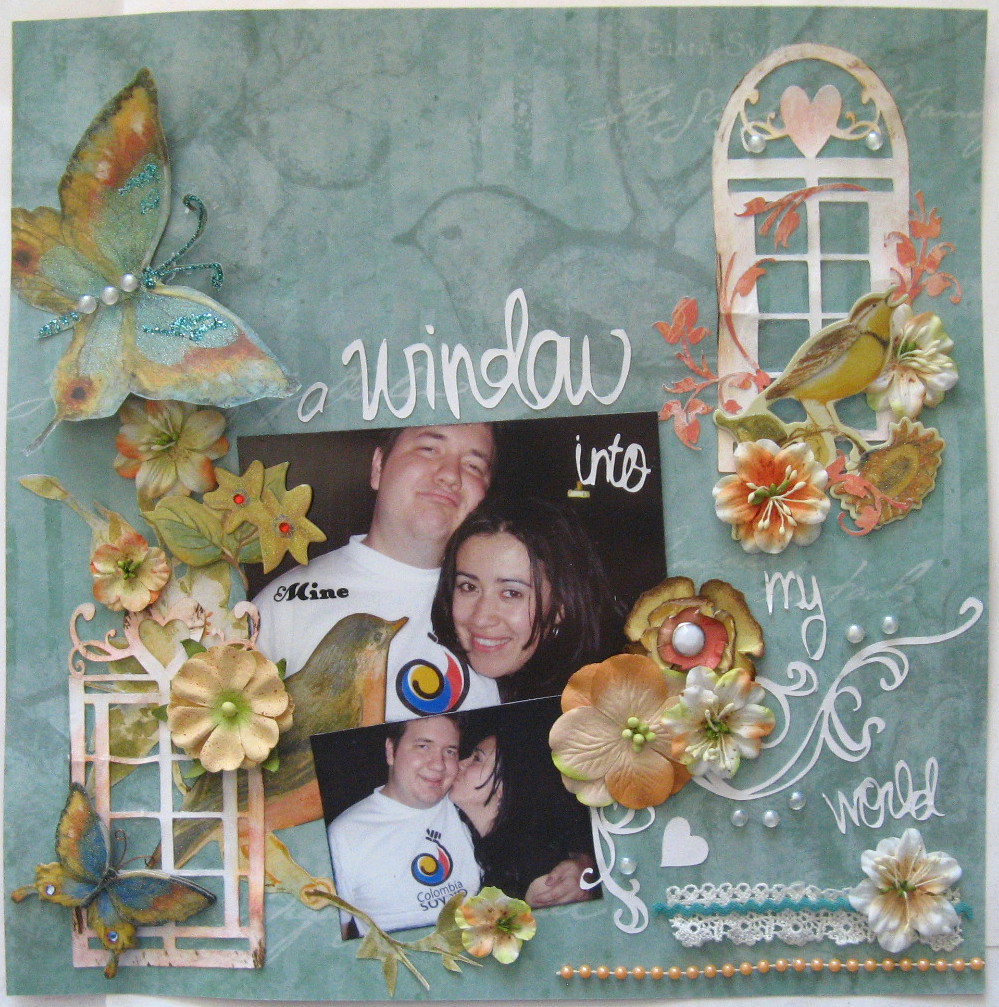
I had so much fun with this window concept that I wanted to do another one for me, so here is a page featuring my darling grand kids with the same theme and same K@Company paper collection.


After cutting the butterfly out from a separate sheet of patterned paper,I added a handmade rose made with matching pp and following a tutorial from Gabrielle Pollacco's blog.


I inked the heart and leaf centers of my Silhouette cuts with orange and red and really like the water color look that matches these papers so well. The edging is done with the same method demonstrated on my "Sweet" post.


I have been so inspired by the beautiful handmade flowers of so many of the talented artists at SB.com that I decided to try my hand at creating my own, so using Prima flowers as a guide, and with the instructions I read once in a magazine rattling around jumbled in my brain, I came up with this lace flower. It's still a work in progress that I hope to improve on, but one thing that I do really like about it is that it lies down so nicely in the protective sleeve in my albums without the bulk that so many of the blooms I use create.

Here are the steps that I used, though I am very open to suggestions on how I can improve.

1st: I created a pattern by cutting out 2 different sized circles. The large one is 3" and the second one is 2". I also cut a small circle in the middle. I then folded them in half.

2nd: I fold over my strip of lace just enough so my half circle pattern fits, placing the fold of my circle on the fold of the lace and cut around both circles.


My lace circle then looks like this:

Repeat the same step with the smaller circle so you have 2 circles of lace, a large and a small. While it isn't necessary, for this particular flower I also cut a circle of matching silk for the base, leaving out the doughnut whole in the center.

3rd: Use a needle and thread to sew a running stitch around the edge of the inner circles of both pieces of lace as demonstrated below.


4th: Gently pull the thread taut, gathering and ruffling the lace on both the large and small circles.

5th: Stitch the the 3 circles together in the center of your flower, material on the bottom, then the large circle of lace next, with the small circle on top.


Finally: Embellish with beads, brads, buttons or whatever else you can come up with. I sewed beads to this flower and also added a brad in the center.

Below are some variations. I sewed strung beads to the edge of lace on one flower, added stickles to the edges of the silk on others, which is not only pretty but has the added benefit of preventing fraying. You have only the limits of your imagination!
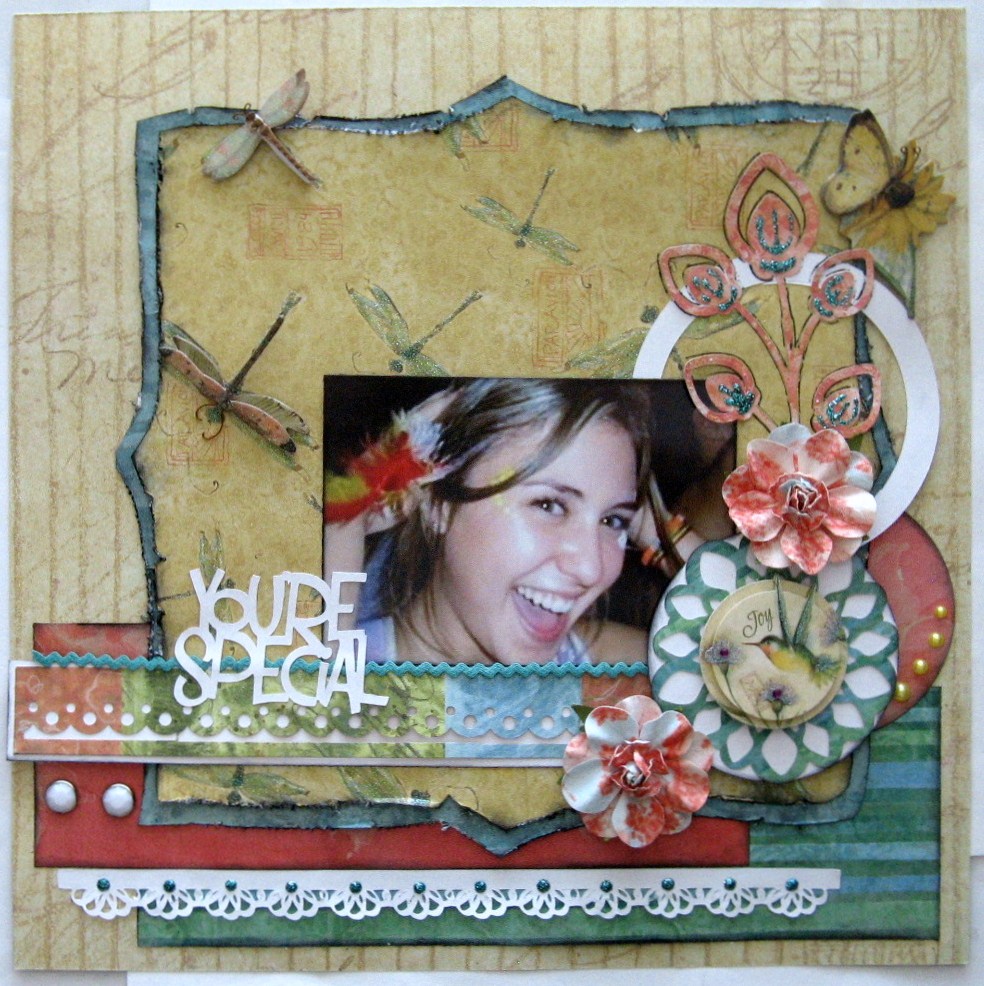
a Window to my World ~ Ben and Astrid

That top pic of Ben with his fiance, though she wasn't at the time, cracks me up with his smug lip curl. It's a look that says, "Yup, she's mine," and who can blame him? She is a beautiful girl. Of course, she got herself a darn good catch in my son too; it's just that she isn't gloating about it in the pix!

Yes, these are still more of the K@Company Susan Winget "Nature" collection, and more Prima flowers, along with one hand made one left over from my last layout. The die cuts are all done with on the Silhouette.


I lightly inked the windows die cut with orange and red adding a bit of Tim Holtz brown paint dabber and then painted over them with "clear rock candy" Distress crackle paint. I wish the shine it gives the window panes showed up better in the photo here. Those little vines are the punched out pieces that I saved from the circle doily I cut on one of my cards.

The bird below is another one cut from the patterned paper, as is the butterfly. The bird above is one of the beautiful dimensional stickers.

Thanks again for dropping by.

Thursday, March 25, 2010

Always a Friend

This is my lovely niece with her adorable friend from college. I mentioned awhile back that I have recently reconnected with one of my old college friends, and just the other night I received a late night call from one of our other roommates! Now all five of us are back in touch on face book!

I began this layout by cutting the spray of flowers and the bird from different sheets of patterned paper, and yes, I am still working through the K@Company Susan Winget "Nature" collection. It is amazing to me that these papers all coordinate so well with each other while still creating such different looks. Once I had cut out the flowers and bird, I positioned them, along with my photo, on a piece of white card stock, marking them with a pencil and then applied my "indian corn," "frost" and "English ivy" Glimmer Mist accordingly.

I then used FISKARS Ripple wide deco edge scissors to create the border, inking the edges dark brown. I cut the green patterned bracket frame from the center of another sheet of patterned paper reserving the outer edge as a border for my misted background. I used the background of a Websters Pages sticker sheet for the bracket pattern.

The photo mat is the backing from the K@C sticker packaging, which I inked in dark brown. I used an Autumn Leaves
clear acrylic stamp for the swirl.


I made the gold flowers from card stock and patterned paper from the "nature" collection, along with American Crafts large jewel brads using an altered version of the tutorial offered by the inspiring, and talented Gabrielle Pollacco at:
http://gabriellepollacco.blogspot.com. The blue and white flowers are Prima Painterly Petals Hydrangeas and e-line pearls.


The title is a Basic Grey rub-on from the "Origins" collection.


Thanks so much for dropping in.

You're Special

My niece Paige really is special, and not just to me, though definitely that too. She is a joy to scrap since, I swear, she has not once in 22 years taken a bad picture, but not only is she beautiful, she is naturally happy and brings joy to everyone around her just by being in her presence.


Along with the K&Company Susan Winget "Nature" specialty paper pad and cooridinating stickers, I also used Prima - Belle Arte Collection - Mulberry Flower Embellishments - Roselle and e-line jewels, American Crafts large white jewel brads, Ranger Ink - Stickles Glitter Glue - Aqua, Making Memories circle cutting system and Quickutz Silhouette to cut the title, doily, white lace border, along with a Martha Stewart Crafts - Edge Punch - Scallop Dot.

I created the background shape using the same method described in my "Remember Friends" post on making circles, except that for this layout I used the background shape form a Webster's Pages sticker sheet as a pattern.


Thanks so much for taking a look!


Wednesday, March 24, 2010

K&C "Nature" cards


Some simple cards I made from scraps of the lovely K@Company Susan Winget "Nature" paper and stickers, along with my Silhouette, some card stock and trim.

Tuesday, March 23, 2010

.So Sweet


I pulled grandma duty Saturday. These are my grand kids Ceairrah (9) and Gary (3). My oldest son purchased a hand gun recently and wanted to go to the shooting range and try it out. I have an intense dislike of guns myself, and tried in vain to pass it on to all my sons, but born to a family of rednecks, their uncles and grandpa prevailed with my oldest, the father of these 2 little darlin's. He is a smart gun owner however, with a locked gun case and the wisdom to leave his toy gun obsessed 3-year-old with grandma. Our area actually has a pretty cool gun range that I only know about because both the husband and son of my friend work there. It's a pretty cool little place even though I don't care for gun, so if you do, and you are ever in Central Utah, here's a photo and link: http://www.carbon.utah.gov/nssr/


For this layout I also used the K@Company Susan Winget "Nature" collection. I began by using this Creative Memories circle cutting system to cut a circle and ring out of the center of the background page. I had a strip of paper left from another layout that I want to place underneath the cut out circle. Because I want the butterfly to over lap the top sheet, I used my craft knife to trace around the bottom portion so I can lift it from underneath and over the top sheet of patterned paper. I add adhesives to the corners of the square that I have trimmed to fit underneath the circle as shown below.


Fro
m the back it looks like this:

I then attach the page to a 12x12 sheet of white card stock just to hide the ugly back and keep it from catching on the protective sleeve. Notice below how the butterfly wings I cut overlap my distressed, inked circle.

I then positioned my photos and added my embellishments. I cut the foliage from the same sheet of patterned paper that I placed underneath the circle, then added a dimensional sticker. The photos are layered under and over my partially cut out butterfly, to which I added Prima e-line pearls. Notice that I also distressed and inked the edges of my background paper.


The embellishment cluster below is a combination of a Prima flower, dimensional stickers from the "Nature" collection and die cut swirls that I cut on my Silhouette, which I also used to cut the title.


The trim is more from the delightful collections of vintage lace I purchased at: http://www.amillionmemories.com/category.php?id=17.

Thanks so much for stopping in to take a look!

Monday, March 22, 2010

Sassy


I am having so much fun scrapping these pictures of my son's fiance Astrid. She is such a lovely girl and these beautiful K&Company papers suit her so well.

This layout is once again done from the Susan Winget "Nature" collection. After punching the background paper and photo mat, I mounted them both on white card stock and cut around the scallops so the white shows through making the pretty punching stand out. I also inked in a dark shade of pink around the background edge. The title is a Cosmo Cricket rub-on that I attached to one the of darling Nature dimensional stickers. The swirl is a tLc rub-on.


This lace is such a fabulous find, and I must give my generous friend and fabulous shopper Bettylou a shout out for having found and shared this great site with me. You have to watch it carefully because the inventory changes, but look at this gorgeous little lace kit! The address is: http://www.amillionmemories.com/category.php?id=17


One entire sheet of this gorgeous line of paper is covered in these gorgeous butterflies just perfect for cutting out and adding to your layouts. I inked the edges of these in black, folded up the wings and added some Prima eline pearls. The flower stem is also by Prima.

I really hope I haven't bored you with this paper line, because I am not done yet! K@C has long been one of my favorite brands, and this new line has so many different color combination's and is so Spring-like when I am so tired of winter... so please check back for more!